Private/Public concepts
Resources launched inside a VPC will be assigned an IP address from the CIDR block assigned. For example, for a 10.0.0.0/16 CIDR block, an EC2 instance could have 10.0.0.42 as its IP address, depending on which subnet it lives in.
All IPs inside that VPC CIDR block are private : they only make sense inside that VPC and cannot be reached from the Internet or from any other network/VPC unless the routing has been setup accordingly. In order to make an EC2 instance publicly reachable, two conditions must be fulfilled:
- the EC2 instance must have a public IP address
- an Internet Gateway must be attached to its VPC route table
An Internet Gateway is a highly available component that brings connectivity to your VPC, allowing access to the Internet. Your public resources must reside in a subnet that’s associated with a route table that has a route to an Internet Gateway. This subnet is called a public subnet.
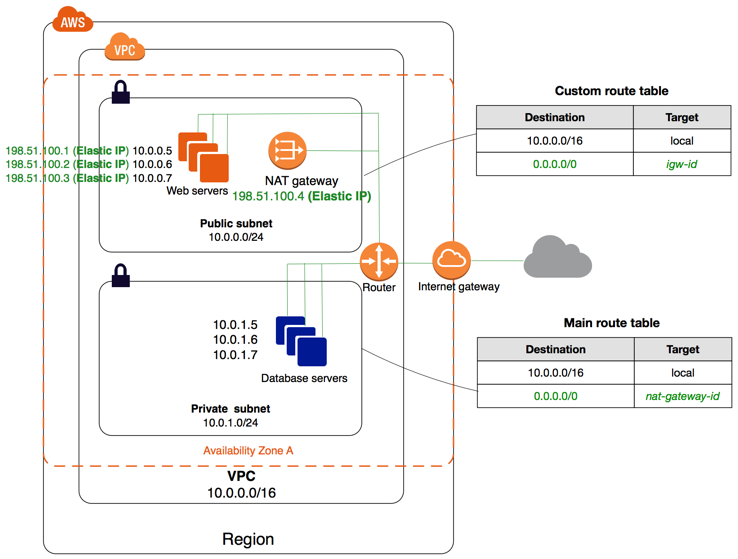
A private subnet, on the other hand, is associated with a route table that does not have a route to an Internet Gateway. The resources that should remain private, reside in these subnets. However, it can happen that some private resources need access to the Internet to download some software, but while remaining unaccessible from the Internet. In this case, you can configure a NAT Gateway to allow egress Internet access from the private instances.
The NAT Gateway allow your EC2 instance to connect to the Internet, but prevent the Internet from connecting to it. The NAT Gateway resides in a public subnet in a certain Availability Zone. In order to allow your private subnets to use the NAT Gateway to connect to the Internet, you must add it to the route tables they are associated with. Note that a NAT Gateway still needs an Internet Gateway to access the Internet. The NAT is only present to proxy the Internet traffic for the private instances, but the Internet Gateway remains the main and only Internet exit gate for a VPC.
Note that all subnets in a VPC, regardless of being public or private, can communicate with each other by default because they belong to the same VPC CIDR. This is not a traditional networking use case, but in AWS, when the VPC gets created, all route tables are assigned a route to the VPC CIDR.
LAB 2:
Refer to Lab Architecture for architecture.
Create a public subnet:
- Go to VPC Services and on the left panel, click on Subnets
- Click on Create Subnet
- choose your VPC from the list
- give it a name (PublicSub-“Your Initials”)
- choose one of the Availability Zones
- Use the first /24 of your VPC CIDR (i.e. 10.10.0.0/24)
- Click Create Subnet
Now, your subnet is setup but can only communicate within the VPC by default.
- In the VPC Services tab, click on Route Tables
- Click on Create Route Table
- choose your VPC from the list
- give it a name (PublicRT-“Your Initials”)
- Click Create
- On the Route Tables interface, look for your route table:
- select the route table
- on the panel at the bottom, click on Subnet Associations
- Edit subnet associations and select your public subnet and Save
Now, you have a public route table that will be used to route all external (such as Internet) traffic to and from your public subnet. However, we still don’t know how to go to the Internet as we have no exit door yet.
- In the VPC Services tab, click on Internet Gateways
- Click on Create Internet Gateway
- give it a name (IGW-“Your Initials”) and Create
- Once it is created, you should be on its configuration page:
- click Actions and select Attach to VPC
- select your VPC and Attach
Now, your Internet Gateway belongs to your VPC environment, so we can set it up to route all Internet traffic.
- In the VPC Services tab, click on Route Tables
- On the Route Tables interface, look for your public route table:
- select the public route table
- on the panel at the bottom, click on Routes then Edit routes
- Click Add route, set the following:
- Destination: 0.0.0.0/0 (0/0 means everywhere, it is not restricted to a specific network)
- Target: Select Internet Gateway from the drop-down and click on your IGW-XXXX
- Save the changes
Now, you have a public subnet! In a few sections, we will setup an EC2 instance, called public instance as a result of sitting in a public subnet, and test connectivity to the Internet.
Create a private subnet:
- Go to VPC Services and on the left panel, click on Subnets
- Click on Create Subnet
- choose your VPC from the list
- give it a name (PrivateSub-“Your Initials”)
- choose one of the Availability Zones
- Use the second /24 of your VPC CIDR (i.e. 10.10.1.0/24)
- Click Create Subnet
Now, your subnet is setup but can only communicate within the VPC by default.
- In the VPC Services tab, click on Route Tables
- Click on Create Route Table
- choose your VPC from the list
- give it a name (PrivateRT-“Your Initials”)
- Click Create
- On the Route Tables interface, look for your route table:
- select the route table
- on the panel at the bottom, click on Subnet Associations
- Edit subnet associations and select your private subnet and Save
Now, you have a private route table that will be used to route internal traffic. At the moment, we are unable to reach the Internet since we have no NAT Gateway.
- In the VPC Services tab, click on NAT Gateways
- Click on Create NAT Gateway
- give it a name (NGW-“Your Initials”) and Create
- select your public subnet (We choose the public subnet just to configure the NAT, since a NAT is a public instance)
- click Allocate Elastic IP and Create
Now, your NAT Gateway belongs to your VPC environment because it is setup in its public subnet. It is therefore ready to be setup and used by the private subnet.
- In the VPC Services tab, click on Route Tables
- On the Route Tables interface, look for your private route table:
- select the private route table
- on the panel at the bottom, click on Routes then Edit routes
- Click Add route, set the following:
- Destination: 0.0.0.0/0 (0/0 means everywhere, it is not restricted to a specific network)
- Target: Select NAT Gateway from the drop-down and click on your NGW-XXXX
- Save the changes
Now, you have a private subnet with outbound access to the Internet. In the next section, we will setup an EC2 instance, called private instance as a result of sitting in a private subnet, and test outbound connectivity to the Internet.